- Ceiling Tiles
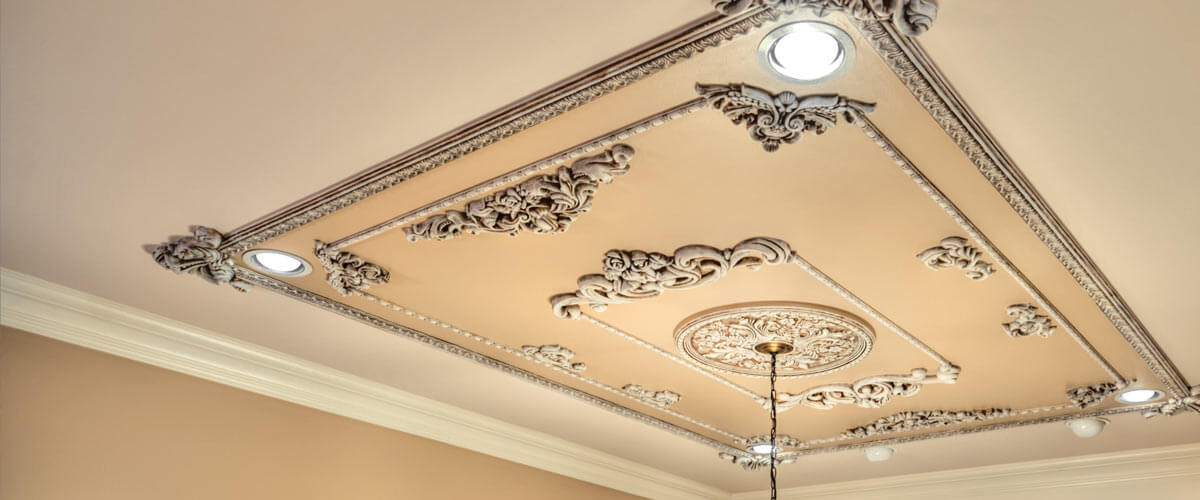
Whether drop in or direct mount, ceiling tiles are one of the easiest and most dramatic changes you can make to your space.
There are slight differences in installation methods between tile series. Below we have listed the instructions for each series.
Designer Series
Materials and tools needed for installation
Tape measure
Pencil / wax pencil
Straight edge
Scissors, razor knife, or aviation snips
(Optional) - Decorative Grid Strips & Adhesive
Personal protection equipment
Installing
Place all of the full sized tiles first, leaving the border and partial tiles for last. Having all the full sized tiles in place will push the grid into its natural position. If you cut and install border and partial tiles first, you may find that they are the wrong size once all the other tiles are in place.
Cutting Tiles
Border / Partial Tiles
Use a tape measure or straightedge to measure the size that your tiles need to be. Make sure the tile is facing the correct direction. Transfer those measurements to the back side of the tile with a pencil or grease pencil. Use scissors, razor knife, or aviation snips to cut the tile and place into the grid.
Fire Sprinklers
If your ceiling has fire suppression sprinklers, you should first consult with your local building and fire officials to ensure that you are conforming to local ordinances.
CAUTION
Fire suppression sprinklers that pass through the ceiling panel must have an opening in the tile that is at least 1/4" larger than the outside of the trim ring that surrounds the sprinkler. This will allow the tile to fall free from the grid without fouling the sprinkler in the event of a fire. Never use any type of grid retainer clip on tiles that have sprinklers through them. Designer Collection tiles are not approved for use below fire suppression systems that are above the grid system.
Can Lights / Recessed Lights / High Hats
In many homes grid mounted lights are very popular. You should choose a tile design that has a large enough flat area for the light bezel to lay flush once installed. You should also choose lights that have grid mounting brackets so that the weight of the light is supported by the grid system and not the tile.
CAUTION
We do not recommend can light fixtures that are not designed for direct contact with insulation nor do we recommend using halogen lighting. Unshielded fixtures, especially those using halogen lighting present a risk of fire or melting the tiles.
Place your light fixture and tile in the grid system. Adjust the light to its final position and mark this on the backside of your tile. Use the appropriate size template to mark the hole in the tile. Use scissors or a razor knife to cut the opening.
High Temperature Areas
Our tiles are designed to not be affected by temperatures up to 120 degrees Fahrenheit. In some cases there may be localized ceiling and tile temperatures that exceed the tiles designed operating temperature. This can happen around heat registers, above stoves and ovens, around high temperature lighting, and in environments that intentionally have higher than normal temperatures, like heat spas, and Hot Yoga/Bikram studios. Please contact us if your space may be subjected to any of these conditions.
Decorative Grid Strips
These strips are designed to cover up the ceiling grid. The adhesive on the back is to aid with installation, and IS NOT a permanent adhesive. Small dabs of adhesive should be applied to the back of the strips or tape. A small dab at each end, and 2 dabs spaced equally in the middle of the strip are adequate to permanently secure the strip to the ceiling. The adhesive backing will allow for the strip to stick to the ceiling long enough for the adhesive to cure. Failure to use adhesive may result in the failure of the strips to adhere to the ceiling.
Approximately 1 tube of adhesive per 125 strips (250 linear feet) is needed. We recommend Red Devil General Purpose Construction Adhesive or Loctite Power Grab All Purpose Adhesive.
Preparation
Make sure your grid system is clean before starting application. Rubbing alcohol or 409 work really well to remove any dust or oils.
For best results, make sure the temperature in the room is between 60 - 80 degrees Fahrenheit and low humidity. Do not peel the backing off until you are installing the strip. Any contamination of the back side of the strips will compromise the performance of the adhesive.
Installing the First Strip
The decorative strips should be butted up to one another. Do not overlap the strips. Make sure to always start at the same end of the strip. You may have to trim each strip slightly, so always put the strip in place before peeling off the backing so you can see if any needs to be trimmed.
Take your first strip. The dot at the end of the strip should be directly over the intersection of 4 tiles. Once you have the strip lined up, peel the backing from the self adhesive and apply small dabs of adhesive to the back of the strip (see above). Run all the strips one direction first.
Finish off by installing the strips that run perpendicular to the tiles. Each strip will need to be trimmed, so keep a pair of scissors or snips in your pocket and cut off the dotted end.
Adhesives -vs- Staples
We recommend adhesive when installing our tiles. Although stapling is an option, adhering tiles with adhesive is the recommended method, yielding the most favorable results (staples can crack the tiles). We recommend Red Devil or Loctite Power Grab All-Purpose General Purpose Construction Adhesive for most applications.
Materials and Tools Needed
Tape measure
Pencil / wax pencil
Chalk line
Straight edge
Scissors or aviation snips
Adhesive (about 1 tube for every 8 tiles)
Paper towels and water for clean-up
Personal protection equipment
(Optional) - Decorative Grid Strips
Surface Types and Methods of Installation
Drywall - Plaster - Cement - Wood
Install ceiling tiles directly to the ceiling using the appropriate adhesive. Verify that your adhesive choice will work for both the ceiling tile and the surface to which it is to be adhered.
Wood Furring Strips
Furring strips attached to the ceiling can be used to mount the tiles. This method is a practical solution for ceilings that are not perfectly flat. Furring strips can be leveled with shims when installing which gives a nice flat area for the tiles to adhere to.
The furring strips should be spaced according to the width and length of the ceiling tile, minus any overlap that may be required. However, if you are installing 2'x4' tiles, we recommend that the furring strips be installed in a 2'x2' pattern so that the middle portion of the tile adheres to it.
Textured Ceilings - Popcorn - Stucco - Etc.
Ceiling tiles should never be applied directly to textured ceilings. The ceiling tiles need to be applied to a flat, even surface. There are several ways to create an appropriate surface. You can remove the ceiling texture, add a new layer of drywall over the existing surface, or install furring strips.
CAUTION
If you decide to remove the popcorn ceiling, consult with a professional about testing for asbestos. Popcorn ceilings may contain the toxic substance. Depending on your local laws, a licensed professional may be required to complete the removal.
Before You Begin
Make sure the surface of your ceiling and ceiling tiles are smooth, clean, and dry. Test your adhesive and tile in a small area before you commit to the whole ceiling.
Planning Your Layout
Take the time to plan your layout. One of the most important things to know is that not every ceiling tile is exactly 2'x2' or 2'x4'. Most tiles are slightly smaller because they can also be used in a grid system, which requires measurements just under a true 2'x2' or 2'x4'. Be sure to check the size of your tile before laying out your ceiling.
With Grid Strips
If you plan on using grid strips to cover the seams, be sure to check the spacing needed between tiles. Use a grid strip to verify the spacing need to allow the grid strips to lay flat.
Note:
Where 4 overlapping tiles meet, the thickness of the tiles compound. With careful planning, you can trim 2 or 3 of the tiles to minimize the thickness. This step is also a personal preference. For most installers, the ceiling height makes the overlap thickness unnoticeable.
Without Grid Strips
Place a few tiles on the floor and check the size and overlap. Typical overlap is 1/4" to 1/2", but this can vary depending on personal preference and the tile design.
Laying Out The Grid
Knowing the accurate size and overlap of the tile is very important for direct mounting. You will be marking a grid on the ceiling to keep everything nice and straight. If you are off by only 1/8 of an inch on each tile, after 8 tiles you will be off a whole inch. Be as precise as you can with your measurements.
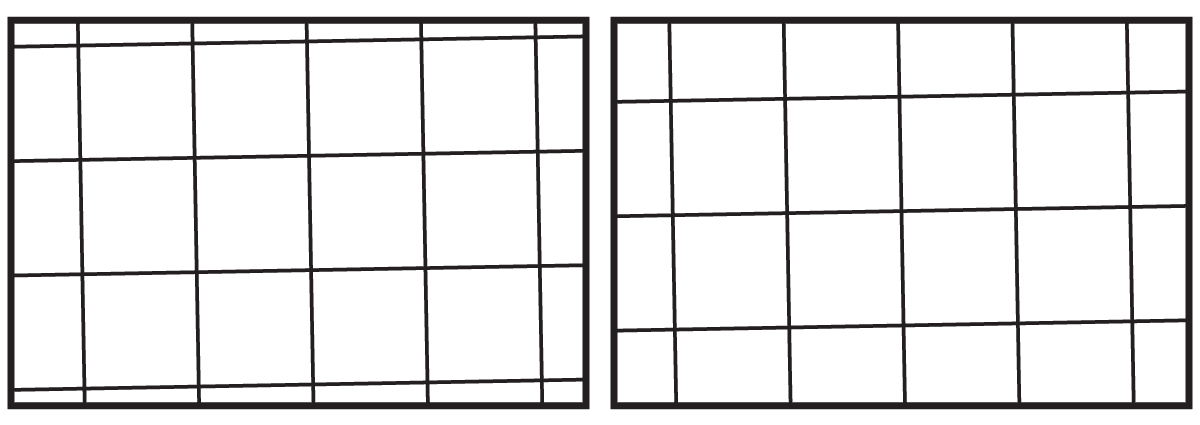
Use grid paper and map out your ceiling. Indicate the position of lights, vents, and any other fixtures or obstructions on the ceiling. The location of these obstacles will determine your layout and overall look of the finished ceiling. Make sure that you take the border into consideration when laying out the tile pattern. A larger border is often preferred over a small one. Use your drawing to plan an even border around your room.
The main area of your space and the longest runs of tile are usually the lines you want square to your starting wall. Using this criteria, select a wall to start from and use it as the base for your lines. Keep in mind that most rooms are not square and many times tile layout is a compromise of room shape and border tile size needs.
Once the pattern has been decided, use a chalk line to snap your rows. Make sure to space your chalk lines according to your size of tile. If you are overlapping tiles during the installation, you will have to reduce your line spacing to account for the tile overlap.
Installing the First Tile
Make sure all your surfaces as well as your hands are clean. Any oils on the ceiling or tiles, even the ones from your skin, can affect the performance of the adhesive. Latex gloves are a great option during the installation process, keeping oils off the tiles, and keeping your hands clean of adhesive.
Take your first tile and apply a bead of adhesive all the way around the perimeter of the backside of the tile. Make the bead 1/8" to 3/16" in size. If the tile center lays flat on the ceiling, add a 4 inch "X" to the center section with adhesive. If the tile has a design where only a few areas touch the ceiling, place some dabs of adhesive on those features. Keep a towel handy to clean up any adhesive that may seep out.
Gently place the tile close to its final location next to your chalk lines. Lightly press the tile to the ceiling as you slide it into position. This lets the adhesive spread out and smear around. Once you are satisfied that the tile is in place, firmly press the tile to the ceiling, rubbing out any bumps in the adhesive.
Second Tile - With Overlap
Use the same gluing technique as the first tile. Place the second tile next to your first one, overlapping the edge(s) by your predetermined amount. Your grid should have marks showing where your tile edge should be. Continue to place full sized tiles, adjusting as necessary to remain lined up on your grid lines.
Second Tile - Without Overlap
Use the same gluing technique as the first tile. Place the second tile next to your first one. The edges of each tile should just be touching. Don't press the tiles together with force. Use a Grid Strip to confirm you are placing the tiles with the correct spacing. Continue placing full sized tiles adjusting as necessary to remain lined up on your grid lines. For non-overlapping tiles, creating a small space between tiles to remain on your layout is ok. These gaps will be covered by Grid Strips when finished.
Obstructions
Ceilings can have objects that have to be trimmed around such as light and vents. Save these areas for last. Trim tiles to fit into the areas making sure to align the pattern. Save your scraps as you may be able to use them in other areas. If you have chosen a tile with a large relief, you may need to use border tiles around these areas for best results.
Border Tiles
Measure the open space from the installed tile to the wall. Make sure to take measurements at each end of the space, as these measurements are often different. Make sure the tile is facing the correct direction. Transfer your measurements to your border tile and cut it.
Just like the full size tiles, run a bead of adhesive all the way around the perimeter of the tile and in the center area of the tile as needed. If the border tiles are really small, you may not need to apply any adhesive in the center.
Decorative Grid Strips
These strips are designed to cover up the seams between non-overlapping tiles. Each strip is 2 feet long with an attractive embossed pattern.
The adhesive on the back is to aid with installation, and IS NOT a permanent adhesive. Small dabs of adhesive should be applied to the back of the strips. A small dab at each end, and 2 dabs spaced equally in the middle of the strip are adequate to permanently secure the strip to the ceiling. The adhesive backing will allow for the strip to stick to the ceiling long enough for the adhesive to cure. Failure to use adhesive may result in the failure of the strips to adhere to the ceiling.
Approximately 1 tube of adhesive per 125 strips (250 linear feet) is needed. We recommend Red Devil General Purpose Construction Adhesive or Loctite Power Grab All Purpose Adhesive.
Preparation
Make sure your tiles are flat and any adhesive that has oozed out between the cracks has been cleaned up. If your tiles have been up for a while, take some time to clean the area that the strips will be applied to. Rubbing alcohol or 409 work really well to remove any dust or oils.
For best results, make sure the temperature in the room is between 60 - 80 degrees Fahrenheit and low humidity. Do not peel the backing off until you are installing the strip. Any contamination of the back side of the strips will compromise the performance of the adhesive.
Installing the First Strip
The decorative strips should be butted up to one another. Do not overlap the strips. Make sure to always start at the same end of the strip. You may have to trim each strip slightly, so always put the strip in place before peeling off the backing so you can see if any needs to be trimmed.
Take your first strip. The dot at the end of the strip should be directly over the intersection of 4 tiles. Once you have the strip lined up, peel the backing from the self adhesive and apply small dabs of adhesive to the back of the strip (see above). Run all the strips one direction first.
Finish off by installing the strips that run perpendicular to the tiles. Each strip will need to be trimmed, so keep a pair of scissors or snips in your pocket and cut off the dotted end.
Legacy Series
Materials and tools needed for installation
Tape measure
Pencil / wax pencil
Straight edge
Scissors, razor knife, or aviation snips
(Optional) - Decorative Grid Strips & Adhesive
Personal protection equipment
Installing
Place all of the full sized tiles first, leaving the border and partial tiles for last. Having all the full sized tiles in place will push the grid into its natural position. If you cut and install border and partial tiles first, you may find that they are the wrong size once all the other tiles are in place.
Cutting Tiles
Border / Partial Tiles
Use a tape measure or straightedge to measure the size that your tiles need to be. Make sure the tile is facing the correct direction. Transfer those measurements to the back side of the tile with a pencil or grease pencil. Use scissors, razor knife, or aviation snips to cut the tile and place into the grid.
Fire Sprinklers
If your ceiling has fire suppression sprinklers, you should first consult with your local building and fire officials to ensure that you are conforming to local ordinances.
CAUTION
Fire suppression sprinklers that pass through the ceiling panel must have an opening in the tile that is at least 1/4" larger than the outside of the trim ring that surrounds the sprinkler. This will allow the tile to fall free from the grid without fouling the sprinkler in the event of a fire. Never use any type of grid retainer clip on tiles that have sprinklers through them. Legacy Series tiles are not approved for use below fire suppression systems that are above the grid system.
Can Lights / Recessed Lights / High Hats
In many homes, grid mounted lights are very popular. You should choose a tile design that has a large enough flat area for the light bezel to lay flush once installed. You should also choose lights that have grid mounting brackets so that the weight of the light is supported by the grid system and not the tile.
CAUTION
We do not recommend can light fixtures that are not designed for direct contact with insulation nor do we recommend using halogen lighting. Unshielded fixtures, especially those using halogen lighting represent a risk of fire or melting the tiles.
Place your light fixture and tile in the grid system. Adjust the light to its final position and mark this on the backside of your tile. Use the appropriate size template to mark the hole in the tile. Use scissors or a razor knife to cut the opening.
High Temperature Areas
Our tiles are designed to not be affected by temperatures of up to 120 degrees Fahrenheit. In some cases there may be localized ceiling and tile temperatures that exceed the tiles designed operating temperature. This can happen around heat registers, above stoves and ovens, around high temperature lighting, and in environments that intentionally have higher than normal temperatures, like heat spas, and Hot Yoga/Bikram studios. Please contact us if your space may be subjected to any of these conditions.
Decorative Grid Strips
These strips are to cover up the ceiling grid. The adhesive on the back is to aid with installation, and IS NOT a permanent adhesive. Small dabs of adhesive should be applied to the back of the strips or tape. A small dab at each end, and 2 dabs spaced equally in the middle of the strip are adequate to permanently secure the strip to the ceiling. The adhesive backing will allow for the strip to stick to the ceiling long enough for the adhesive to cure. Failure to use adhesive may result in the failure of the strips to adhere to the ceiling.
Approximately 1 tube of adhesive per 125 strips (250 linear feet) is needed. We recommend Red Devil General Purpose Construction Adhesive or Loctite Power Grab All Purpose Adhesive.
Preparation
Make sure your grid system is clean and dry before starting application. Use rubbing alcohol or 409 to remove any dust or oils.
For best results, make sure the temperature in the room is between 60 - 80 degrees Fahrenheit and low humidity. Do not peel the backing off until you are installing the strip. Any contamination of the back side of the strips will compromise the performance of the adhesive.
Installing the First Strip
The decorative strips should be butted up to one another. Do not overlap the strips. Make sure to always start at the same end of the strip. You may have to trim each strip slightly, so always put the strip in place before peeling off the backing so you can see if any needs to be trimmed.
Take your first strip. The dot at the end of the strip should be directly over the intersection of 4 tiles. Once you have the strip lined up, peel the backing from the self adhesive and apply small dabs of adhesive to the back of the strip (see above). Run all the strips one direction first.
Finish off by installing the strips that run perpendicular to the tiles. Each strip will need to be trimmed, so keep a pair of scissors or snips in your pocket and cut off the dotted end.
Adhesives -vs- Staples
We recommend adhesive when installing our tiles. Although stapling is an option, adhering tiles with adhesive is the recommended method, yielding the most favorable results (staples can crack the tiles). We recommend DAP Weldwood Contact Cement when installing our Legacy Series Tiles.
Materials and Tools Needed
Tape measure
Pencil / grease pencil
Chalk line
Straight edge
Scissors or aviation snips
Adhesive - 1 Gallon will cover approximately 115 sq. feet of working area (ceiling and tile back).
Personal protection equipment
(Recommended) - Decorative Grid Strips & Adhesive
Surface Types and Methods of Installation
We recommend installing most of our Legacy Series of tiles without any over lap and using grid strips to cover the seams. There are exceptions;
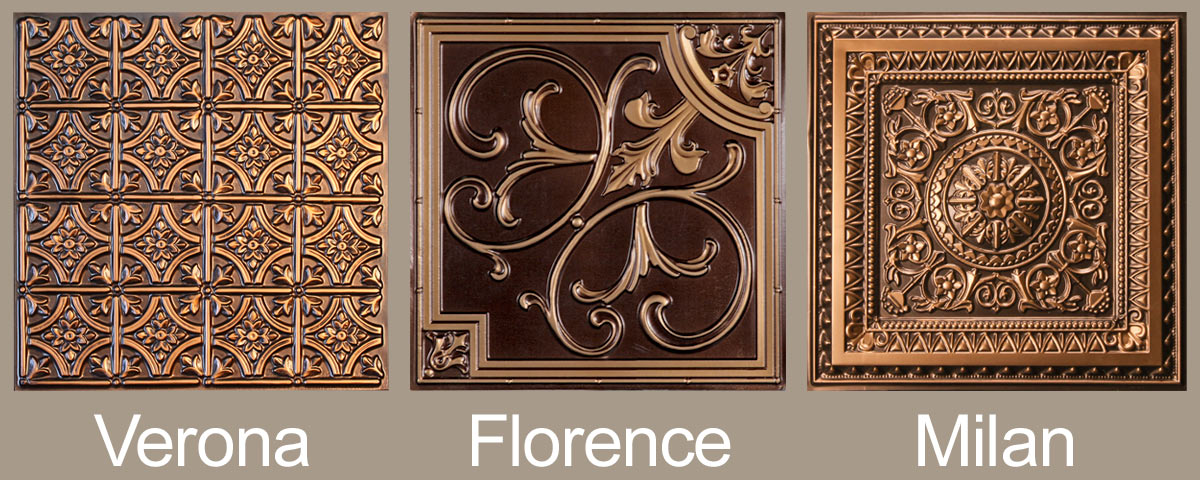
Verona
The Verona tile is designed to be overlapping. Two sides of the tile have a border pattern that hides the seams. Make sure to account for this overlap when laying out your ceiling pattern.
Florence
The Florence tile can be overlapped. If you plan on using grid strips with the Florence, you will need to leave a little space between the tiles when installing. Check your spacing with a grid strip before laying out the pattern on the ceiling.
Milan
The Milan tile can be overlapped when installed. If you plan on using grid strips with the Milan, you will need to leave a little space between the tiles when installing. Check your spacing with a grid strip before laying out the pattern on the ceiling.
All of the other Legacy Series tiles can be installed edge to edge, using grid strips to cover the seams.
Drywall - Plaster - Cement - Wood
Install ceiling tiles directly to ceiling using appropriate adhesive. Verify that your adhesive choice will work for both the ceiling tile and the surface to which it is to be adhered.
Wood Furring Strips
Furring strips attached to the ceiling can be used to mount the tiles. This method is a practical solution for ceilings that are not perfectly flat. Furring strips can be leveled with shims when installing which gives a nice flat area for the tiles to adhere to.
The furring strips should be spaced according to the width and length of the ceiling tile, minus any overlap that may be required. However, if you are installing 2x4 tiles, we recommend that the furring strips be installed in a 2x2 pattern so that the middle portion of the tile adheres to it.
Textured Ceilings - Popcorn - Stucco - Etc.
Ceiling tiles should never be applied directly to textured ceilings. The ceiling tiles need to be applied to a flat, even surface. There are several ways to create an appropriate surface. You can remove the ceiling texture, add a new layer of drywall over the existing surface, or install furring strips.
CAUTION
If you decide to remove the popcorn ceiling, consult with a professional about testing for asbestos. Popcorn ceilings may contain the toxic substance. Depending on your local laws, a licensed professional may be required to complete the removal.
Before You Begin
Make sure the surface of your ceiling and ceiling tiles are smooth, clean, and dry. Test your adhesive and tile in a small area before you commit to the whole ceiling.
Planning Your Layout
Take the time to plan your layout. One of the most important things to know is that not every ceiling tile is exactly 2'x 2' or 2' x 4'. Most tiles are slightly smaller because they can also be used in a grid system, which requires measurements just under a true 2'x2' or 2'x4'. Be sure to check the size of your tile before laying out your ceiling.
Laying Out The Grid
Knowing the accurate size of the tile is very important for direct mounting. You will be marking a grid on the ceiling to keep everything nice and straight. If you are off by only 1/8 of an inch on each tile, after 8 tiles you will be off a whole inch. Be as precise as you can with your measurements.
Using grid strips to hide the seams between tiles allows you to leave a small gap between tiles during installation. This can be very useful when laying out your grid. You can gain a considerable distance by leaving gaps between tiles. Use a grid strip to check the maximum amount of spacing that is practical for your tile choice.
Use grid paper and map out your ceiling. Indicate the position of lights, vents, and any other fixtures or obstructions on the ceiling. The location of these obstacles will determine your layout and overall look of the finished ceiling. Make sure that you take the border into consideration when laying out the tile pattern. A larger border is often preferred over a small one. Use your drawing to plan an even border around your room.
The main area of your space and the longest runs of tile are usually the lines you want square to your starting wall. Using this criteria, select a wall to start from and use it as the base for your lines. Keep in mind that most rooms are not square and many times tile layout is a compromise of room shape and border tile size needs.
Once the pattern has been decided, use a chalk line to snap your rows. Make sure to space your chalk lines according to your size of tile.
Installing the First Tile
Make sure all your surfaces as well as your hands are clean. Any oils on the ceiling or tiles, even the ones from your skin, can affect the performance of the adhesive. Latex gloves are a great option during the installation process, keeping oils off the tiles, and keeping your hands clean of adhesive.
Apply a thin coat of contact cement to the ceiling. Cover an area where a couple of tiles will go. Apply the contact cement to the back of 2 tiles. Allow the contact cement on the ceiling and tile to dry to the touch.
Gently place the first tile in it's final location next to your chalk lines. Very lightly press the tile to the ceiling, checking its position. Don't press too hard or the tile will bond in place. Once you are satisfied that the tile is in place, firmly press the tile to the ceiling.
Second Tile - Without Overlap
Use the same gluing technique as the first tile. Place the second tile next to your first one. The edges of each tile should just be touching unless you are leaving a gap between tiles on purpose. Continue placing full sized tiles adjusting as necessary to remain lined up on your grid lines. Creating a small space between tiles to remain on your layout is ok. These gaps will be covered by Grid Strips when finished.
Second Tile - With Overlap
Apply contact cement where the two tiles will overlap onto the tile already in place and allow to dry to the touch. Place the second tile next to your first one, overlapping the edge(s) by your predetermined amount. Your grid should have marks showing where your tile edge should be. Continue placing full sized tiles adjusting as necessary to remain lined up on your grid lines.
Obstructions
Ceilings can have objects that have to be trimmed around such as light and vents. Save these areas for last. Trim tiles to fit into the areas making sure to align the pattern. Save your scraps as you may be able to use them in other areas. If you have chosen a tile with a large relief, you may need to use border tiles around these areas for best results.
Border Tiles
Use a tape measure or straightedge to measure the size your tiles need to be. Make sure the tile is facing the correct direction. Transfer those measurements to the back side of the tile with a pencil or grease pencil. Use scissors, razor knife, or aviation snips to cut the tile. Use the same installation method as the other tiles to secure to the ceiling.
Decorative Grid Strips
These strips are designed to cover up the seams between tiles. Each strip is 2 feet long with an attractive embossed pattern.
The adhesive on the back is to aid with installation, and IS NOT a permanent adhesive. Small dabs of adhesive should be applied to the back of the strips. A small dab at each end, and 2 dabs spaced equally in the middle of the strip are adequate to permanently secure the strip to the ceiling. The adhesive backing will allow for the strip to stick to the ceiling long enough for the adhesive to cure. Failure to use adhesive may result in the failure of the strips to adhere to the ceiling.
Approximately 1 tube of adhesive per 125 strips (250 linear feet) is needed. We recommend Red Devil General Purpose Construction Adhesive or Loctite Power Grab All Purpose Adhesive.
Preparation
Make sure your tiles are flat and any adhesive that has seeped out between the cracks has been cleaned up. If your tiles have been up for a while, take some time to clean the area that the strips will be applied to. Rubbing alcohol or 409 work really well to remove any dust or oils.
For best results, make sure the temperature in the room is between 60 - 80 degrees Fahrenheit and low humidity. Do not peel the backing off until you are installing the strip. Any contamination of the back side of the strips will compromise the performance of the adhesive.
Installing the First Strip
The decorative strips should be butted up to one another. Do not overlap the strips. Make sure to always start at the same end of the strip. You may have to trim each strip slightly, so always put the strip in place before peeling off the backing so you can see if any needs to be trimmed.
Take your first strip. The dot at the end of the strip should be directly over the intersection of 4 tiles. Once you have the strip lined up, peel the backing from the self adhesive and apply small dabs of adhesive to the back of the strip (see above). Run all the strips one direction first.
Finish off by installing the strips that run perpendicular to the tiles. Each strip will need to be trimmed, so keep a pair of scissors or snips in your pocket and cut off the dotted end.
Need More Help?
Let us know what we can help you with. We've been doing this for quite a long time and we'd love to help you in any way we can.
By Phone
Our friendly staff members are happy to help you through the purchasing and installation experience.
Call us toll-free:
1 (877) 550-0600
Store Hours Monday - Friday
10:00AM-6:30PM EST
(7:00AM-3:30PM PST)
By Chat
Instant message with one of our helpful staff members. Get instant answers without touching your phone.
Live Chat - Monday - Friday
10:00AM-6:30PM EST
(7:00AM-3:30PM PST)

By Email
Email is an awesome way to communicate. You can send us pictures to help describe what you need help with. We love it because it gives us the opportunity to make sure we get you the help you
Email us at sales@udecor.com
We usually respond within 1 business day unless you have a really complicated question. Then we pass your email around to make sure we give you the best solution.
DIY Topics
Explore Creative Ideas